Sunday, September 27, 2009

the simplest, most delicious cilantro tomatillo salsa EVER!


This salsa is simply delicious! Just be careful...once you start, it's hard to stop eating it!

Here's what you need:
  • 4 medium (about 8 ounces total) tomatillos, husked, rinsed and quartered
  • 1 large garlic clove, peeled and quartered
  • Hot green chiles to taste (2 serranos or 1 jalapeƱo), stemmed and roughly chopped
  • 1/2 to 2/3 cup (loosely packed) roughly chopped cilantro
  • Salt
Combine tomatillos, garlic, chile and cilantro in a blender jar or food processor. Add ¼ (I tend to use less so the consistency isn't so thin) cup water and a generous ½ teaspoon salt. Process to a coarse puree. If using a blender, begin blending on low, at first pulsing to get the mixture moving evenly through the blender blades. Pour into a salsa dish and thin with a little more water if necessary (probably not necessary!) to give the salsa an easily spoonable consistency. Taste and season with additional salt, if you think necessary. Serve it right away!! YUM!! :-D

Try this right away! I PROMISE you won't be disappointed!

Thursday, September 24, 2009

'Za' is an acceptable two-letter word in Scrabble


Short for pizza. This is a denouement of sorts from the inaugural post, which described an honest second attempt at the creation of fine French bread. It failed.

What we have here is a pizza, the dough of which a 4-year-old could make. I set my sights lower this time, and the aim was true.

A rundown of the (admittedly simple) ingredients:

3 cups flour
One packet of yeast (1.5 ozs., I think)
25 turns' worth of pepper on my Trader Joe's plastic grinder (about a tsp)
2 tsps. of dried basil leaves (fresh is better but I live in a land of Philistines)
2 tsps. salt
3/4 cup tomato sauce
1 small onion
1 tomato, thinly-sliced
4 cloves garlic
More salt

Combine the first five ingredients a mixing bowl with 1 and 1/4 cup water, and stir together with a spoon. It'll get clumpy after 5 or so minutes. Knead for 2-3 minutes, let rise for 20 minutes, spread by hand into something that resembles a pizza, place on pizza pan.


Spread tomato sauce, add the tomato, onion, garlic, and salt, and, and put in the oven. The oven should be as hot as it gets. (Mine goes to 550 degrees.)


Bake until brown and done (~8-10 minutes.)


The key with this pie is that it was cheeseless and I didn't use any oil, which means, I'd like to think, that it was something more than vegan. The dough was a little dry, but I blame that on lack of proper hydration in the oven. (The use of a pizza stone is recommended by many sources to rectify this problem, I've read, but I don't know what a pizza stone is.) My taste rating for this was an Ohio 7 out of 10, which is a New York City 2 or 3. The onions were important. They definitely shrunk during baking, so don't skimp when you spread pre-oven.

Maybe 40 minutes total of preparation, plus a time spent washing excess flour from one's digits. And you have to eat it quickly. Homemade pizza refridgerated overnight is quite literally for the birds.

Sunday, September 20, 2009

Not for the Faint of Heart

About two weeks ago, Steve and I made something called "Really Spicy Tofu and Peas in Coconut Milk" from the, of course, Mark Bittman cookbook. I've given this entry its title not only because of the spiciness of the dish, but because we made our own coconut milk, which was a dangerous endeavor itself.

Ingredients
3 large onions, quartered
One 28- or 35-oz. can tomatoes with their liquid
2 T neutral oil, like grapeseed or corn
salt and freshly ground black pepper
2 T garam masala or curry powder
1 1/2 - 2 lbs. firm to extra firm tofu, cut into cubes
1 1/2 c peas
1 1/2 c coconut milk
chopped fresh cilantro leaves for garnish
~5 cloves of garlic
1-3 dried chiles

Put the onions, tomatoes, garlic, and chiles into your food processor or blender and blend until smooth.

The more chiles you add, the spicier it will be, so be careful. We actually kept ours pretty tame, only adding two chiles. I think next time we'll add more.

Put the oil in a deep skillet or saucepan. When hot, add the tomato mixture, salt and pepper and spices. Cook until it becomes thick and sauce-like, about 10 minutes. Add the tofu and peas, cook for five minutes. Then comes the time to add the coconut milk. We made our own, which can be accomplished by blending about 2 cups of boiling water with shredded, dried, unsweetened coconut (we had some laying around so we thought we'd use it instead of buying the milk). But be careful! We're not sure what happened, but we think it may have been the very hot water - when we turned the blender on, a very powerful force made the top blow off (even though I was holding it down) and we had coconut shreds all over the kitchen.

After you wait for the water to cool down and you can blend it enough, you strain out the shreds and you have your coconut milk.

So after you add the coconut milk to the pan, you bring it to a boil, adjust seasoning, and serve. Voila! It was very yummy, reminiscent of some sort of Indian dish. We definitely recommend the recipe, but suggest that you just buy your coconut milk instead of trying to make it.

Monday, September 14, 2009

Strong To The Finish: Olive Oil Cake

This was my first time baking anything on my own, as far as I can remember. Baking involves a certain alchemy and hidden process that I find completely counter-intuitive, the translation between what you mix up in a bowl and what you pull out of an oven is difficult imaginative leap for me. The olive oil cake below is, admittedly, not a very flashy cake recipe, but it served as a birthday cake for someone who is now closer to 30 than 20, so more toned down tastes were required. What resulted was a good, versatile cake, chosen largely for the novelty of using olive oil as a flavor.

Ingredients
Butter (to grease pan)
2 cups all-purpose flour
1.5 teaspoons baking powder
1/4 teaspoon salt
1/2 cup extra virgin olive oil
1 cup sugar
4 eggs, separated
1/3 cup freshly squeezed orange juice
2 teaspoons grated orange zest

Steps
  • Preheat oven to 350 degrees. Grease 9 x 13 inch pan. Combine flour, baking powder, and salt in a bowl and set aside.
  • Use electric mixer to beat olive oil with 3/4 cup of the sugar until creamy. Add egg yolks and beat until thick.
  • Mix in the dry ingredients (flour, baking powder, salt) until smooth. Stir in orange juice and zest.
  • In separate bowl, beat egg whites until foamy, then mix in remaining 1/4 cup of sugar and beat until it has soft peaks[1]. Then stir eggs whites into batter, which is going to be very thick.
  • Pour into pan and bake for 35 minutes, or until toothpick comes out clean. Let cool for 15 minutes.
  • Frost or glaze as you like.[2]
[1] I only found out after I was done what "peaks" meant, something like the surface holding it shape somewhat.

[2] I say as you like, particularly, because I underestimated my abilities and made a pretty lame sugar & milk based frosting. Mostly, I would say don't over do it, if you want to appreciate the olive oil and orange flavors.

Tuesday, September 8, 2009

Taco Dip (Vegetarian)

Here's a recipe from my mom, another recipe that makes for a good labor day cookout dish or, as I can attest, goes well with sporting events. I prefer it with Ohio State victories over Michigan, but you can adjust your spectator sport of choice to taste.

Step 1
Spread 1 can of Refried Beans on the bottom of a 9 x 13 pan.

Step 2
Mix 2 large Cream Cheese (softened) and 1 large Sour Cream, and Taco Seasoning of your choice, hot or mild. (Use hand mixer for this) Spread this mixture on top of the refried beans in the pan.

Step 3
Dice up tomatoes and onions, shred lettuce. Make the next layer consisting of these items.

Step 4
Top with shredded cheddar cheese.

Step 5
Dip Tortilla Chips in and Enjoy!

Monday, September 7, 2009

Au Gratin....aka Freedom Breadcrumbs

This, like my last post, is more of a tip than a recipe. The tip is basically this: if you've got some vegetables or leftovers you're not sure what to do with, make it au gratin and you've got something new. Here's an example:

Grease a baking dish. Add the vegetables that you want to gratin-ize. Here we used broccoli and canned asparagus (dented can from "local" big box store, $.85). Cover with a layer of cheese and a layer of breadcrumbs. Broil for 5 minutes. Enjoy.

Sunday, September 6, 2009

Our Labor Day Strawberry-Rhubarb Pie

I've made this pie a few times before (a recipe I cut out from a Woman's Day magazine :) years ago) and it's one of our favorites. Wes asked me to make it and I was especially excited because I thought I might be able to get some fresh rhubarb at the farmer's market. Sadly, there was no fresh rhubarb to be found at the market or Whole Foods, so I had to resort to the frozen stuff. The pie did turn out wonderfully and the frozen rhubarb tastes just as good!

Ingredients
1 refrigerated read-to-use pie crust

Crumb topping
1 c flour
3/4 c uncooked rolled oats
1/2 c sugar
1/4 tsp ground cinnamon
1 stick (1/2 c) butter, melted

Filling
1 c sugar
1/4 c cornstarch
4 and 2/3 c one half inch pieces fresh rhubarb or 1 bag (20 0z) frozen rhubarb, thawed, drained and patted dry
2 pt (12 oz each) strawberries, halved (I cut them smaller, depending on the size of the strawberry)
1 Tbsp grated orange peel (not completely necessary)

Directions
1. Heat oven to 400 F. Fit pie crust into a 9-in deep-dish pie plate and flute edges. Line a baking sheet with foil.
2. Topping: Mix first 4 ingredients in a medium bowl. Add butter. Toss with a fork to form crumbs.
3. Mix sugar and cornstarch in a medium saucepan. Stir in rhubarb. Bring to a simmer over medium heat and, stirring often, cook about 3 minutes or until juices have thickened. Add strawberries and orange peel. Toss to coat. Pour into crust.
4. Gather crumbs, a handful at a time, and squeeze gently to clump. Break in small pieces, sprinkle over pie. Place pie on lined sheet to catch drips, and believe me, it definitely will!

5. Bake 50 to 60 minutes until fruit bubbles around edges and topping is golden brown (cover with foil if it looks like it's getting too dark too soon, you can always uncover it later on to finish browning crust). Cool on a wire wrack. Serve warm or at room temperature. We recommend serving it warm with vanilla ice cream. Happy Labor Day!

San Mateo Bean Dip

This bean dip is in honor of the start of football season. (Go Irish! 35-0 yesterday! :) It's one of my husband's favorite football snacks. It also makes a great appetizer for a party. The dip is probably devoid of any real nutritional value, but it's pretty darn tasty, and sometimes that's all that matters, right?

Ingredients:
  • 8 oz. cream cheese, softened
  • 1 cup sour cream
  • 1 can of Frito's plain bean dip
  • 1 package of McCormick's Original Taco Seasoning
  • 3/4 cup of grated sharp cheddar cheese
  • 3 chopped scallions (optional)
  • 10 drops Tabasco sauce (optional)

Combine all ingredients in a large bowl and beat with mixer until thoroughly combined. Put dip in casserole dish. Bake in oven at 350 degrees for 30 minutes. Serve warm with tortilla chips.

(Sorry there's no picture. Kendall started eating it before I could take one!)

This Pizza is F'ing Awesome


I've always liked making my own pizza. I used to get those pre-made pizza crusts when I was in college and add toppings. I never thought they were all that good and they are pretty expensive for what you get. The I started picking up a ball of pre-made dough from Trader Joe's (only costs like a buck) but I could never make it taste like much more than cardboard. So I ventured online to find a recipe for a homemade pizza crust and -- I found a great one (who knew the internet could be so helpful?) The downside is that it takes some time. This is a recipe found on allrecipes.com (not a bad site, I've used it a few times).

It goes like this:

INGREDIENTS

  • 1 teaspoon white sugar
  • 1 1/2 cups warm water (110 degrees F/45 degrees C)
  • 1 tablespoon active dry yeast
  • 1 tablespoon olive oil
  • 1 teaspoon salt
  • 2 cups whole wheat flour
  • 1 1/2 cups all-purpose flour

DIRECTIONS

  1. In a large bowl, dissolve sugar in warm water. Sprinkle yeast over the top, and let stand for about 10 minutes, until foamy.
  2. Stir the olive oil and salt into the yeast mixture, then mix in the whole wheat flour and 1 cup of the all-purpose flour until dough starts to come together. Tip dough out onto a surface floured with the remaining all-purpose flour, and knead until all of the flour has been absorbed, and the ball of dough becomes smooth, about 10 minutes. Place dough in an oiled bowl, and turn to coat the surface. Cover loosely with a towel, and let stand in a warm place until doubled in size, about 1 hour.
  3. When the dough is doubled, tip the dough out onto a lightly floured surface, and divide into 2 pieces for 2 thin crust, or leave whole to make one thick crust. Form into a tight ball. Let rise for about 45 minutes, until doubled.
  4. Preheat the oven to 425 degrees F (220 degrees C). Roll a ball of dough with a rolling pin until it will not stretch any further. Then, drape it over both of your fists, and gently pull the edges outward, while rotating the crust. When the circle has reached the desired size, place on a well oiled pizza pan. Top pizza with your favorite toppings, such as sauce, cheese, meats, or vegetables.
  5. Bake for 16 to 20 minutes (depending on thickness) in the preheated oven, until the crust is crisp and golden at the edges, and cheese is melted on the top.
Just a few notes: this obviously makes two crusts. So, you may want to freeze one. The time to do that is after the first rise when you separate them. Then when you thaw it, you let it rise for the last 45 mins. If you don't freeze it, it keeps for a few days in the refrigerator.

Completing the pie:
We've tried a couple variations: standard pepperoni, jalapenos, tomatoes, mushrooms with store-bought sauce.
Tonight we tried something different and it was awesome. Here's how to replicate the awesomeness:
Instead of using a store-bought sauce, I made an oil based sauce (olive oil, pepper, salt, crushed garlic, grated parmesan cheese) and brushed it on the crust with a pastry brush. Then we added lots of fresh tomato slices, mozzarella cheese and grated parmesan flakes on top. Then bake until the cheese is a little browned and add fresh arugula leaves to the top.

This was a really good change inspired by a pizza my sister made a few weeks ago. I hope you'll try it!


Varada's Palak Paneer

This is a delicious recipe from my good friend Varada. She makes lots of wonderful dishes with paneer, and this is one of my favorites.


Ingredients

1 package paneer* (about 200 grams)
2 bunches of palak, i.e. spinach (I just used 2 bags of spinach)
1 onion (I only had green onions and they worked well)
1 tsp ginger garlic paste (I used a tsp of both ginger powder and garlic paste as a substitute)
2 med-lg tomatoes
1/2 c milk
1/2 tsp red chili powder
1/2 tsp garam masala*
a few tablespoons of oil
salt to taste
a little lemon juice is also good to add to taste
*likely only available at an Indian grocery store
Oh, and you'll want some rice too. I served my palak paneer over jasmine rice and it was perfect!

Directions
Go ahead and start your rice first so it's ready when you finish the palak paneer.

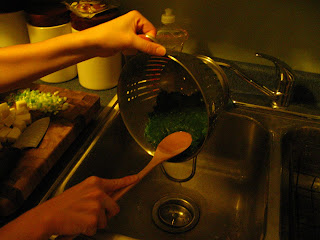
1. Pick, wash and boil palak leaves in minimum water for about 8 minutes. (I used one of my larger pots and filled it will a few inches of water. Two bags of palak does sound like a lot but it cooks down quite quickly. Also, don't worry about putting too much water into the pot, you can always drain the palak in a colander and squeeze out any excees water with a spoon, see photo below.)

2. Grind boiled palak coarsely. (I used my food processor but a blender should work well too.)

3. Cut the paneer into cubes and deep fry until golden brown. (I heard about a different trick for cooking paneer that I prefer and always use when I make paneer now. Simply bring a pot of water to a boil, turn off heat, add paneer cubes, let sit for about 15 minutes, and drain. The paneer turns out soft and slightly chewy without all of the grease and mess of deep frying!)


4. Chop onion. Puree the tomatoes. (Again, I used a food processor for the tomatoes but a blender will work too.)

5. Add oil to a large saucepan and heat. Add the chopped onions.

6. When the onion has cooked some, add the ginger garlic paste and chili powder.

7. Next add the tomato puree and cook until oil leaves the pan.

8. Now add the garam masala powder and palak.
Mix well.

9. Add milk and let cook until it is of thick consistency.

10. Add salt to taste and perhaps a bit of lemon juice if you like. I played around with the spices a bit, adding more chili, garam masala, and garlic to taste. Add paneer just before serving and enjoy!


A Tasty Little Egg Sandwich


Breakfast happens to be one of my three favorite meals, so I tend to experiment a little when I'm cooking it. This is a simple little breakfast sandwich that tastes great. I'll admit I feel like it's a little unnecessary to tell you how to assemble a sandwich, but maybe you wouldn't have though of this. All you need is:
1) A bagel ( I used a "the works" bagel)
2) Sliced Cheese (I used Asiago)
3) 1 tomato (sliced)
4) 1 egg
5) Cream cheese

Start by toasting 1 bagel. While it's toasting, I just cooked the egg over-medium (I normally break the yolk after the white is mostly cooked just so it's not really runny. And then I flip it and remove it from the heat quickly).
When the bagel is toasted, you can put cream cheese on one half and sliced asiago on the other (I know that it seems a little overboard to use both cheeses, but trust me, the cream cheese makes it). Then put your cooked egg on top of the asiago half (to melt the cheese). Now just put a couple of tomato slices on top and make into a sandwich. It was a pretty good breakfast. I think I'll save this one...


Who Made the Cheese?

Continuing our adventure through Mark Bittman's cookbook, on Friday night, Steve and I made cheese. Yes, that's right, cheese. It took us back to our German roots, though the result was something more akin to Indian paneer or Mexican queso fresco - a very mild, crumbly white cheese.

To make cheese, all you need is 1/2 gallon of milk (preferably whole), 1 quart of buttermilk, and a pinch of salt. You begin by boiling the milk, which should take 10 to 15 minutes, but ended up taking us about 45. We're not exactly sure why - could have been our electric stove's unreliable heat, the pot-cookie sheet combination we were using to provide a thicker bottom to the pot so that the milk wouldn't burn (do not try this at home! not a good idea, as we found out when we nearly burned a hole through our cookie sheet), too much stirring...I don't know. It did seem interminable though.

This is Steve stirring the unboilable milk.

During the boiling, I sustained an injury because I grabbed the hot cookie sheet without using a hotpad. You'll see evidence of that later. After the milk finally boils, you add the buttermilk and stir constantly until it separates into curds and whey.

Here you can see the cold washcloth wrapped around my finger.

The curds and whey will look like cooked egg whites floating in a slightly yellowish liquid. Then you strain the curds from the whey by pouring it through a cheesecloth lined colander. After straining, it should look like this:


The next step is to gather up the ends of the cheesecloth to form the curds into a ball, twisting the top to help squeeze out any extra whey. You can run the ball of curds through cold water so it's not too hot to handle and then just continuing squeezing out the whey until it feels firm and dry.


After you've squeezed out as much whey as you want (you can squeeze less out and it will become cottage cheese), tie a string around the top to keep the ball from opening and then tie that string to a wooden spoon. Place the spoon over the sink or a bowl to let the remaining whey drain out. Let it sit for about an hour and a half undisturbed.


Then remove the cheesecloth and taste your homemade cheese! You'll feel very accomplished!